As always when learning for the first time, you pick up on the basic functionality such as configuring a Dynamics Portal Entity Form to point to a Dynamics 365 entity form. For example, the "Customer Service - Create Case" Dynamics Portals form that end users see when creating a new Case is the "Web - Create Case" Dynamics 365 entity form.
Once you get past the basics there's the second part of learning - unlocking what you don't know by exploring and working with what's available to create a cool output. This is what I cover in Part 1 of my Web Form vlog series by showing other configuration within Web Form Steps that can be utilized to change the end user experience. Watch my vlog below to learn more.
Scenario
The Dynamics Portal I've provisioned uses the Community Portal and since I'm a Game of Thrones fan, this is the theme of my portal. It's recruitment for individuals in Westoros where applications can be submitted for different positions. Good luck surviving in Westoros ;)

I created two custom entities for the application process,
- Application - details of the position they are applying for.
- Compliance - proof of evidence that needs to be supplied such as Passport. This is inserted as a sub-grid in the Web Form Step.
I then created two Web Forms where each one has Web Form Steps,
- New Application
- Edit Application
How this ties in altogether is illustrated in the ERD diagram below. ERD probably isn't the best method for outlining how it all works but I find it helps whenever I teach people about Dynamics Portals.
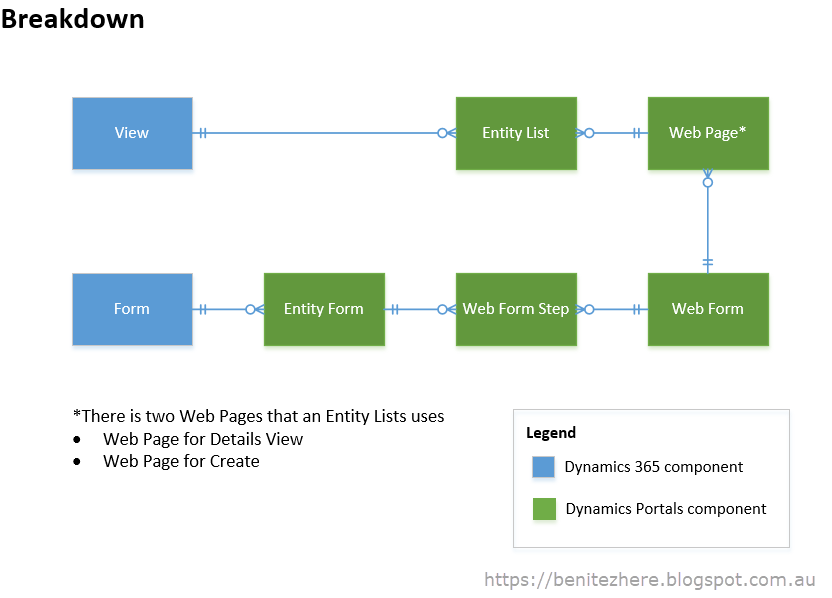
The above is how you would configure Dynamics Portals Web Forms and Web Form Steps. These are the components required to set up a flow of information an end use needs to complete.
The end user experience for the Application process is as follows which is represented by the Web Forms Steps.

I had a different expectation
What you don't realize until you configure Web Form Steps and do a run through is that the Previous, Next and Submit button isn't quite what you think it is.
When your first Web Form Step is an Insert in a "New Application" process, the record will be created in Dynamics 365 when the end user clicks on the Next button. Any other clicks within the Web Form of Previous, Next or Submit (in the last Web Form Step) will save any changes made along the way. They are all a "Save" button in the context of Dynamics 365.

If you have used other portals before, there is functionality where end users can go back to a saved form to complete at a later date and submit when ready.
Due to the nature of Dynamics Portals with Dynamics 365, this is not the immediate experience as by default in Dynamics 365 when a record is Saved, it is created or updated. Dynamics Portals respects this.
With additional configuration methods, you can achieve a similar outcome to the Save and Submit experience.
With additional configuration methods, you can achieve a similar outcome to the Save and Submit experience.
Tell me more...
The following can be applied
- Relabel the the step labels
- Add an additional Web Form Step in the Web Form where it will redirect back to the view (Entity List)
- Use a workflow to update the record Status Reason
1. Update the labels in Web Form Steps
To make it more clear to the end user that what they are entering will be saved, rename the labels in all the Web Form Steps
- Previous = Save and Previous
- Next = Save and Next
- Submit = Save and Close


2. Create a new Web Form Step of Redirect
As you would have seen in my vlog (please watch if you haven't already done so!) when a end user clicks on "Submit" in the last step, a message is displayed and the end user remains in the last Web Form Step.

If they wanted to go back to the My Applications view (this is an Entity List), they need to click within the top navigation menu. This is an extra click and in my opinion not the best user experience. They should automatically be redirected back to the My Applications view.
To achieve this, you can create a new Web Form Step where the type is "Redirect." This way when they click on the relabeled Save and Close button in the last Web Form Step, the Redirect will be executed taking them back to the My Applications view.

BUT FIRST...
Hold on to your horses, there's actually something else you need to configure before hand. One thing to know about Dynamics Portals is that there's quite a number of configurations to complete to get one process to work as it's all native within Dynamics 365. So for a Web Form Step to redirect to an Entity List, you need to first create a Web Page that references the Entity List.
In the screenshot below, you'll see that my Web Page is linked to the My Applications Entity List.

OK CONTINUE...
Once you have a Web Page that points to the desired area in Dynamics Portal, select the Web Page in the redirect Web Form Step.

3. Create a workflow to update Status Reason
The last bit of the jigsaw puzzle is to utilize a workflow that will update the Status Reason to allow the end user to "Submit." I created a new Status Reason of Submitted and updated the default value to Unsubmitted. I then created an on-demand workflow that will update the Status Reason from Unsubmitted to Submitted.

After the workflow is created, you then need to create an action within the Entity List. Why? Well the last Web Form Step is redirecting back to the Entity List. Entity Lists can have additional actions where one of them is calling a workflow. In this case, we want to link the workflow so that the Application Status Reason can be updated to Submitted.
Simply associate the on-demand workflow to the Entity List and update the label to something more meaningful such as "Submit Application."

Bonus Tip
Update the message of the workflow to something more meaningful such as "Thank you, your application has been submitted." By default, the success message is "Workflow was initiated" which doesn't really make sense to the end user.
BUT FIRST...
Hold on to your horses (again), there's something else I recommend you configure before hand. Make sure you have two filtered views that the Entity List will display.
- Unsubmitted applications where Status Reason is Unsubmitted.
- Submitted applications where aStatus Reason is Submitted.
This will allow the end user to switch between the views.


Hammer time! Ready to test
Once the configuration has been completed, the end user will now be redirected back to the My Applications view in the last Web Form Step.

The end user can then submit their application when they are ready by clicking on the Submit Application "button." Once the workflow is successfully completed the application will drop off from the Unsubmitted Applications view and appear in the Submitted Applications view. Ta-da!

Summary
Dynamics Portals is native to Dynamics 365 and respects how it works out-of-the-box which is why the buttons will create and/or save a record when using Web Forms (or Entity Forms). In this vlog post, I showed you how you can use other configuration methods to achieve the save and close, and submit functionality. Be open minded and explore what else can be done to achieve a similar outcome.
Make sure you subscribe to my YouTube channel and follow me on Twitter.
I'm new to Twitter and so far it's going OK! Thank you to those who have followed me so far on Twitter.
Stay tuned for Part 2 of Dynamics Portal Web Forms with me.
Toodles.
0 comments:
Post a Comment